CONGRATULATIONS, you’ve just purchased a nice guitar stand from Bulldog Music Gear. This manual will give you all the information you need to take care of your guitar stand and have many years of pleasure displaying your instrument the way it should be displayed. With that in mind, we hope you’ll take a few moments to read through this entire owner’s manual. In this manual all types of guitar stands, floor stands or wall hangers are reffered to as ‘guitar stands’.
For detailed info on the specifications or warranty of your guitar stand, please visit the “Products” and “Warranty” sections of www.bulldogmusicgear.com. Also read the FAQ section on our website first, where many questions are already answered. You can always contact us directly if you should have any other questions as well: Bulldog Music Gear - Attn: Customer Relations - Nederokkerzeelsesteenweg 4a - 3071 Kortenberg - Belgium - [email protected]
CARE AND MAINTENANCE
Your new Bulldog Guitar stand is precision crafted to give you many years of pleasure using it. A few simple maintenance procedures will help keep your stand in top condition for years to come.
Keep Your Stand Clean: Dirt, dust, skin oils, perspiration and smoke can prematurely age the finish and fittings of your stand. Wipe down the entire stand with a soft dry polish cloth regularly. The finish may be damaged by cleaners or waxes that contain solvents such as thinner or alcohol.
Examine the stand periodically: Over time, the shifting weight of your instrument may cause the aluminum hanger to loosen. Examine it from regularly. If loose parts are neglected and not tightened up, the moving weight of the instrument may cause the hanger to become too loose and eventually come out of the wood.
Setup And Adjust As Needed: Familiarize yourself with the setup and adjustment procedures of the guitar stand.
Lacquer Finishes: Many instruments are finished with nitrocellulose lacquer, a thin natural type of wood finish that has been used on handcrafted furniture and musical instruments for many years. Nitrocellulose Lacquer is a relatively thin and somewhat porous finish that allows the tone-woods to resonate much more freely, resulting in a more vibrant tone. While this lacquer allows the instrument to vibrate generously, it is much more subject to the effects of wear and aging of the underlying wood, chemical interactions and climatic conditions, than urethane or polyester finishes. If your instrument is finished with nitrocellulose lacquer, please make sure that you read the “Lacquer Finishes” precautions and instructions that accompany your instrument. Avoid exposure of nitrocellulose lacquer finishes to dyed fabrics or leathers, plastics, synthetics and surgical rubber tubing, (used on many guitar stands, hangers and straps), these materials will react adversely with the lacquer and mark the finish of the instrument. If you are unsure of what type of finish is used on your instrument, please check the detailed specifications of your instrument. Bulldog Music Gear can confirm that the natural woolfelt used on its guitar stands, do not react with most of the guitar finishes in the market today, including Nitrocellulose. However, each manufacturer has their own composition of Nitrocellulose, with different proportions of the chemicals involved. There are numerous variations of lacquer in use today, making it impossible for us to know what type is used exactly. Therefore, to provide your instrument with the best support, we recommend you to refer to your instrument's owners manual for more information.
UNDERSTANDING THE EFFECTS OF TEMPERATURE AND HUMIDITY
Your guitar stand has been constructed with the finest materials and processes available. However, this guitar stand, like all items made from wood, can be sensitive to fluctuations in temperature and humidity. The woods of your stand can absorb moisture from the air when it is humid, and evaporate moisture out when the humidity falls. The wood also expands and contracts with changes in temperature. This can cause cracking, warping or other damages. These defects due to high or low humidity or temperature are not covered by the warranty. The temperature range for storage and use is from 15 to 30 degrees centigrade (60 to 85 degrees Fahrenheit) and out of direct sunlight. The humidity range for storage and use is between 40% and 60%. Do not use your guitar stand outside or in wet conditions.
CAUTION
WARRANTY
Our warranty clauses can be consulted on our website under the title ‘Warranty’. Please read these clauses if you wish to return one of our products for repair or replacement.
Thank you for buying one of our stands. We truly hope it will give your instrument the ability to stand out and shine, and amaze your friends and family for many years to come!
ATTENTION: Only use the provided wallplug for installation in a solid wall. Plyboard, Gyproc or other hollow materials are not suited for installation with this wallplug. Please consult a hardware store to purchase the right plug if you need to install the hanger in a non-solid wall.
Caution! The aluminum carrier consists of some small and very sharp pieces and should not be handled by children. Keep the pieces out of children’s reach! Keep small pieces away from children to avoid swallowing or cuts. Assembly or disassembly should be done by adults only. Use correct protection gloves to avoid cuts. The sole purpose of the carrier is to hang your stringed instrument. Do not use it for any other purpose.
Install the plug into a solid wall using a number 10 drill (10mm). After installing the plug, screw the rear conical piece on the M8 bolt and then into the carrier. Screw the bolt into the installed wallplug by turning the carrier clockwise and tightening it. When the carrier sits in the correct position then tighten the conical block towards the wall if necessary to secure the carrier in your position of choice.
Use the M8 bolt, the spiky washer and the aluminum tube. See technical drawing below for assembly. Fasten tightly into the aluminum center piece. Put the hanger in the provided carrier hole of your Dragon One or Phoenix stand. The fit is rather tight, push carefully in the stand.
General adjustment of the hanger:
The woolfelt rings slide over the carrier arms. Unscrew the carrier arms first before putting on the wool felt rings. Each carrier arm should be fitted with 11 woolfelt rings to ensure complete protection of your instrument. Insert the carrier so that the 2 arms are only pointing upwards. Only in this way your guitar hangs securely on the hanger. To adjust the carrier, simply unscrew the 2 arms and adjust to the correct width of your instrument. When you have the correct width tighten the two arms again. Your carrier is now adjusted correctly. The correct width is measured at the nut of your instrument, and is just as wide or barely wider than your guitar’s nut width. Assymetrical headstocks are can be adjusted in the same way. The hanger can be installed to the correct angle of the headstock. A bumper is provided to protect your instruments neck where it could touch the aluminum. Put it on the flat part in the front of the aluminum ball. Remember you can customise your carrier arms with different colours of natural woolfelt matching your instrument. Visit our website to explore the possibilities. Enjoy your hanger!
Important Notice!
Adjust the 2 carrier arms to the correct neck width before installing your instrument!
The carrier arms must point upwards!


Caution! The aluminum carrier consists of some small and very sharp pieces and should not be handled by children. Keep them out of children’s reach! Keep small pieces away from children to avoid swallowing or cuts. Assembly or disassembly should be done by adults only. Use correct protection gloves to avoid cuts. The sole purpose of the carrier is to hang your stringed instrument. Do not use it for any other purpose.
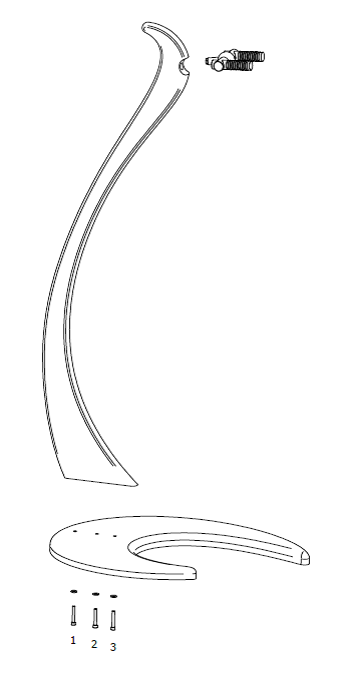
When mounting your stand with the provided bolts be sure that the first bolt that you mount is the one in the middle of the stand. Then the rear bolt towards the end of the stand. Finally mount the front bolt. There are 3 bolts to be mounted. Use an allen key number 6 to tighten the bolts. Do not overtighten. Handtight is good enough.
Unscrew the carrier arms first before putting on the woolfelt rings. Then slide the woolfelt rings over the carrier arms. Each carrier arm should be fitted completely with woolfelt rings to ensure protection of your instrument. In case you have purchased a guitar lock for the carrier, leave out one ring to put your lock in place. When installing the guitar lock, the carrier arms will not be adjustable, the fixed width will be 50mm. When inserting the carrier, you can choose between 5° or 15° inclination of the carrier arms. This will depend on your guitar and what you feel is the best way to hang your instrument. Insert the complete carrier firmly in the head of the stand. To adjust the carrier width, simply unscrew the 2 arms and adjust to the correct width of your instrument (if you have purchased a guitar lock for the carrier, the width will be fixed at 50mm). When you have the correct width tighten the two arms again. Your carrier is now adjusted correctly. The correct width is measured at the nut of your instrument, and is just as wide or barely wider than your guitar’s nut width. You can adjust the carrier to the correct angle of the headstock (ex: asymmetrical headstocks). A bumper is provided to protect your instruments neck where it could touch the aluminum. Put it on the front of the aluminum ball. You can customise the carrier arms with different collors of natural woolfelt matching your instrument. Visit our website and explore the possibilities. Enjoy your stand!
Important Notice!
Adjust the 2 carrier arms to the correct neck width before installing your instrument!
Put one bumper in the front of the aluminum ball to protect your instrument.
Caution! The aluminum carrier consists of some small and very sharp pieces and should not be handled by children. Keep them out of children’s reach! Keep small pieces away from children to avoid swallowing or cuts. Assembly or disassembly should be done by adults only. Use correct protection gloves to avoid cuts. The sole purpose of the carrier is to hang your stringed instrument. Do not use it for any other purpose.
When mounting your stand with the provided bolts be sure that the first bolt that you mount is the one in the middle of the stand. Then the rear bolt towards the end of the stand. Finally mount the front bolt. There are 3 bolts to be mounted. Use an allen key number 6 to tighten the bolts. Do not overtighten. Handtight is good enough.
Unscrew the carrier arms first before putting on the woolfelt rings. Then slide the woolfelt rings over the carrier arms. Each carrier arm should be fitted completely with woolfelt rings to ensure protection of your instrument. In case you have purchased a guitar lock for the carrier, leave out one ring to put your lock in place. When installing the guitar lock, the carrier arms will not be adjustable, the fixed width will be 50mm. When inserting the carrier, you can choose between 5° or 15° inclination of the carrier arms. This will depend on your guitar and what you feel is the best way to hang your instrument. Insert the complete carrier firmly in the head of the stand. To adjust the carrier width, simply unscrew the 2 arms and adjust to the correct width of your instrument (if you have purchased a guitar lock for the carrier, the width will be fixed at 50mm). When you have the correct width tighten the two arms again. Your carrier is now adjusted correctly. The correct width is measured at the nut of your instrument, and is just as wide or barely wider than your guitar’s nut width. You can adjust the carrier to the correct angle of the headstock (ex: asymmetrical headstocks). A bumper is provided to protect your instruments neck where it could touch the aluminum. Put it on the front of the aluminum ball. You can customise the carrier arms with different collors of natural woolfelt matching your instrument. Visit our website and explore the possibilities. Enjoy your stand!
Important Notice!
Adjust the 2 carrier arms to the correct neck width before installing your instrument!
Put one bumper in the front of the aluminum ball to protect your instrument.

Assembly or disassembly should be done by adults only. The Mini Dragon is provided with different bumpers to install at will and protect your instrument. We also advise putting 4 bumpers under the stand to dampen contact with different kinds of floors. Make sure your instrument is always touching the bumpers when installed on the stand.
Our Mini Dragon is adjustable. To adjust, put the stand in front of you on a stable surface, loosen the screws very lightly, move the 2 center pieces simultaneously in the same direction, back OR forth. When you found the correct width for your instrument, handtighten the screws again. Do not adjust the width by force or without lightly loosening the screws.
ATTENTION: Please allow 48 hours, after putting on the bumpers, for the glue to strenghten before putting on your instrument! In some cases, after a while, the bumpers can start to move due to high humidity or temperature changes. Check the bumpers regularly to avoid this. If you see that they move we suggest to put on a small dot of contact glue under the bumpers to be sure that they hold firmly to the wood and your instrument is secure. Keep all small pieces away from children to avoid swallowing or cuts.
Make sure that the little round sticker on the different center wood pieces is facing the front of the stand (facing you) when assembling the pieces to make sure everything fits perfectly. When assembling the Mini Dragon first tighten the screws lightly, then adjust the stand to the width you require for your instrument. Adjust the width of the stand by turning the two middle pieces together in the same direction (both forwards or both backwards)! Do not use force, it should go smoothly. Once you have the correct position, tighten the screws. Do not overtighten. Do not use electrical or battery operated equipment to tighten the screws. Overtightening might damage the wood. Handtight is good enough. Put on the brass screw caps lightly, do not tighten them, they are just there to cover the screws, not to hold the stand together. After a few days of use, check the screws again to make sure everything is assembled well. Enjoy your stand!
Screw 3,5 x 35mm above (upper middle piece)
Screw 4,0 x 40mm below (lower middle piece)

ATTENTION: Only use the provided wallplug for installation in a solid wall. Plyboard, Gyproc or other hollow materials are not suited for installation with this wallplug. Please consult a hardware store to purchase the right plug if you need to install the hanger in a non-solid wall. Assembly or disassembly should be done by adults only.
Caution! The aluminum carrier consists of some small and very sharp pieces and should not be handled by children. Keep them out of children’s reach! Keep small pieces away from children to avoid swallowing or cuts. Assembly or disassembly should be done by adults only. Use correct protection gloves to avoid cuts. The sole purpose of the carrier is to hang your stringed instrument. Do not use it for any other purpose.
Install the plug into a solid wall using a number 10 drill (10mm). After installing the plug, screw the M8 bolt into the carrier and also install the conical block right behind the carrier. Then put the screw through one of the holes in the wooden part. The 3 holes are provided for choosing the most suitable position for your instrument and give you the option of positioning the wooden piece as you like. Screw the bolt into the installed wallplug by turning the carrier clockwise and tightening it. When the carrier sits in the correct position to the wooden piece then tighten the conical block towards the wood if necessary to secure the wooden piece in your position of choice.
The woolfelt rings slide over the carrier arms. Unscrew the carrier arms first before putting on the wool felt rings. Each carrier arm should be fitted with 11 woolfelt rings to ensure complete protection of your instrument. Insert the carrier so that the 2 arms are only pointing upwards 5°. Only in this way your guitar hangs securely on the stand. To adjust the carrier, simply unscrew the 2 arms and adjust to the correct width of your instrument. When you have the correct width tighten the two arms again. Your carrier is now adjusted correctly. The correct width is measured at the nut of your instrument, and is just as wide or barely wider than your guitar’s nut width. Assymetrical headstocks are can be adjusted in the same way. The carrier adjusts itself to the correct angle of the headstock. A bumper is provided to protect your instruments neck where it could touch the aluminum. Put it on the front of the aluminum ball. Remember you can customise your carrier arms with different colours of natural woolfelt matching your instrument. Visit our website to explore the possibilities. Enjoy your hanger!
Important Notice!
Adjust the 2 carrier arms to the correct neck width before your instrument!
The carrier arms must point 5° upwards!